It's been a real challenge for me to stay on task with the grunt work of the exterior here at the McBeachshack - I keep getting lured away by my inner Muse wanting to play inside with the interior - the fun part! I keep pushing that to the back burner for now, because I'm doing my best to push through and give the exterior my full attention - it will be done faster that way, and I won't have to keep thinking about it. Any normal person would know that and get on with it.
.... Not me.
 At 3 am my precious sleep was abruptly shattered by my creative flow --which, by the way, pays no attention to mundane things such as time of day and such .... so I shot up in bed, leaned into Poor Tired Husband's ear and began chattering away about my ideas for the living room. He is such a good sport - he didn't get angry, and he even grunted sleepy responses occasionally.
 Mega talented Joni, over at Cote de Texas got my heart pumping yesterday with her incredibly gorgeous post featuring my hearts desire wrapped up in homes in Belgium. (If you haven't seen it, do yourself the favor and go check it out! You'll be drooling within seconds)
While I, myself, don't have anything as grand, I can certainly make Museville look much better than its currant state and the beauty within Joni's post lit a fire that no amount of guilt regarding my little McVilla's unfinished exterior could stop. Not even close. It would be like trying to stop a tidal wave with a feather. My creative flow refused to be denied. Beides, this current Massive Chaos and Construction style here on at Shack ala Muse is making me seriously blue!
So I got pragmatic and right down to business. I needed more than a rough idea - I needed a paint color - or colors. I don't think this yellow is going to do.
I didn't have to look far for inspiration
some Dove white Linen ...

or the burlap ... or both.
And then there is the wicker and perhaps tortoise shell blinds --

Enter a little grey in the Angels on my broken slab of color washed concrete

Add a little more grey and some silver to the mix from my sweet little cherub

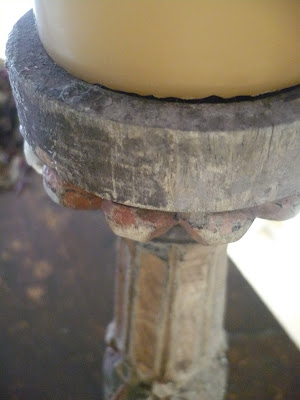
A pair of old chippy large, wax covered candlesticks that I have are heavily playing into the color palette for the walls - this candlestick is two toned. I've had it for over 20 years and one side shows its age in sun-faded paint and cracks born of father time and mother nature, while it lived outside. The paint hues on the other side, however, are the same as when I purchased them because that side faced the western sun - and something different than you would expect happened -- the afternoon heat, instead of fading the colors, melted all the wax that had dripped down the side, creating a protective layer, thereby freezing time for the paint beneath it. If you look at the photo below, you can see the different halves.
 The luscious darker grey seen is going on my bookshelves and will be layered in a few shades and then sanded back to expose all hues, including the current mahogany stain.
The taupes and silvers, sagey green that's also in my delicious velvet sofa and these lighter greys are going in a wash reserved for my large armoire.

The dusky mauve/taupe will make a nice undertone to keep it all from looking too chilly.

This is the second candlestick - it doesn't have that same rosy element - it's the perfect combination of colors for that armoire, don't you think it will be gorgeous?
 I love these candlesticks - I don't know where they are going to end up, but they aren't going back outside - maybe in the bathroom... maybe on top of the grey armoire or dark shelves ...
So first thing this morning, with candlesticks in tow, I went to pick out and purchase paint. I came home with a plethora of everything here - along with some glaze, rags and a new "Lambie" ...
While I do a lot of layering when I paint the furniture, there isn't any layering involved on the walls -that's right - none. ...and it's a lot easier than you think. You just slap all the colors you are using up on the wall - all at once - in heavy (dripping heavy) swatches in random places in a 4' x 4' or so area ... using the same brush for all colors -

working in that 4' x 4' area, using your brush, swirl the colors all together, moving in any pattern you choose - you can't make mistakes. The more you mix, the less dramatic the contrast - stop whenever you are happy with what you see. Don't go too far, or you'll just have one muddy color.

After swirling, take your sheepskin tool (watered down and squeezed out, and dabbed with a brush with each color you are using before you initially begin - you only have to do this once, at the start) and blot in random motions to soften the brushstrokes and lines between colors - the more you blot, again, the softer the contrast gets. (again, don't go too far)

And you end up with a one of a kind interior that perfectly compliments everything in your room. This picture doesn't do it justice. ... but you'll have to wait and see the final reveal!


Hrm... too dark -- Needs more of the dove white in the mix- that's the beauty of this process, you can just paint right over it and change it as you go! Much easier than colorwashing and working with wet edges.
So that's what's going on here today - there's always tomorrow for the outside
.... right?


 Another option for my hideaway is my deck, which is
  But for now, paintbrushes with my name on it are waiting for me - Try as I might, I can't ignore that the exterior of my


 And of course ... I'll need blackboard paint...
 To be (happily) continued.


